
Binoculars are first and foremost characterized by a pair of numbers like 8 × 30 or 7 × 50. The first number is the magnification and the second shows the aperture in millimeters. For astronomy, the aperture should be as large as possible and not less than 30mm. Smaller devices don‘t gather enough light and often they are of low quality – many are cheap toys and not optical devices. With 30mm aperture you can already see much of the sky and 50mm are quite powerful – many a department store telescope has a similar aperture. Larger models are quite heavy and unwieldy, so they are especially useful for purely astronomical purposes. Because the price also rises rapidly with the aperture, they are more suitable for the ambitious user. By the way, the increase in light-gathering between naked eye and 50mm binoculars is similar to the gain when switching from binoculars to a telescope with about a 14” aperture – which costs several thousand dollars instead of less than 200 dollars.
The magnification influences not only the field of view, but also the image brightness and contrast. At low magnification, the field of view is usually larger, and the binocular is perfectly suited to observe star clusters or the Milky Way. With increasing magnification more details become visible, but the image gets darker. This is not necessarily a disadvantage – if you are under a bright, light-polluted sky, a slightly higher magnification helps to darken the sky background and thus to enhance the contrast. The background brightness is thereby evenly distributed over a larger area in the eye, while the point-like stars continue to be perceived only as points.
If you are observing the sky with a 50mm model mostly in the vicinity of urban areas, you‘ll probably see more at 10x magnification than with a 7x magnification. Binoculars with seven times magnification are ideal especially for star clusters and the Milky Way, while at ten times magnification or more somewhat fainter deep-sky objects become visible. Large binoculars from about fifteen times magnification are even suitable for observing fine details on smaller objects or the Moon and planets.
The 7 × 50 can be seen as a typical „all-purpose binocular“. But often, a 10 × 50 is the better choice since we never reach the perfect dark adaptation in North America or close to cities.
An important number which can be calculated easily is the exit pupil. It is obtained by dividing the aperture by the magnification. A pair of 7 × 50 binoculars for example has an exit pupil of 50mm / 7 = 7.14mm, and with a 10 × 50 this value is reduced to 5mm. The exit pupil tells you how large the beam of light is when it leaves the eyepiece. It should not be larger than the opening of your pupil, but also not significantly smaller. As a rule of thumb, young people usually have a maximum pupil aperture of 7mm, and at the age of 30 it drops to 5mm – but these are only averages. At the age of 25, for example, openings from 4.5 to 8.5mm were measured, and values of 3 to 6.5mm for 55 year old people. The individual values are influenced by exercise and training as well as by genetics. They are also affected by the ambient brightness – if you observe in light-polluted, urban places, you‘ll never observe with maximum pupil opening.
.
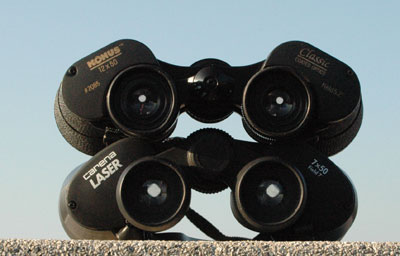
The size of the exit pupil depends on the magnification. On top is a 12 × 50 with a small exit pupil and below is a 7 × 50 where the light beam corresponds approximately to the average pupil diameter of the eye.
In 1993, the result of the multiplication of aperture and magnification was proposed as an indication of the performance of binoculars. An 8 × 30 would thus have a value of 240 and a 7 × 50 would have a value of 350. That would be slightly worse than the slightly smaller 10 × 40 with 400 and a 10 × 50 would provide 500. The higher the value, the better is the suitability for astronomy. Zoom binoculars are in theory a good thing, but usually they pay a very high price for the various possible magnifications, since image quality and field of view suffer – or remain acceptable only for very expensive models.
Besides aperture and magnification, it is also very important which objective lenses and prisms are used. To compensate for chromatic aberrations, the objectives of modern binoculars consist of several lenses. There are also the prisms which invert the image – an astronomical telescope without prisms shows an upside-down image. Since there are reflections on each glass surface, brightness and contrast are reduced. To minimize these reflections the surfaces can be coated. With low cost models, only some of the lenses may be coated, while good binoculars have coating on each lens. In vague statements such as „coated optics“ caution is recommended – this may also mean that only the outer sides of the front lenses or the eyepiece are coated. Here, you have to trust the manufacturer‘s declaration – the dealers often only know what is printed on the packaging.
The color of the lenses gives a first indication of the coating. If you hold a pair of binoculars at an angle to the light, usually a reddish or greenish tinge appears. A good coating of magnesium fluoride shimmers uniformly purple. If the coating is too thick, it looks greenish, while a pink shimmer may indicate a too thin coating layer.
A green shimmer can also be caused by very good, multi-coated lenses. With these lenses, the light loss of 1.5% can be reduced to less than 0.5% per surface. Unfortunately, low cost models can seem like multi-coated lenses because of a much too thick coating on the lenses. However, they provide an image with a much poorer contrast and image brightness than good binoculars.
The prisms are the most important difference between a pair of binoculars and a telescope. The older design of binoculars use Porro prisms. Binoculars with Porro prisms are somewhat bulkier than those with the more elegant roof prisms and the distance between the objective and eyepiece is longer. Roof prisms allow a straight and thus more compact design with lighter weight. Porro prisms are a bit more useful for astronomical use, as they are not only of lower cost but also provide brighter images for the same amount of money.
If you hold the binoculars looking at a bright object (never towards the Sun!), and look through them at arm‘s length, you can learn a lot about the type of glass used for the prisms. If the exit pupils appear as clear, round circles against a dark background, higher quality BaK-4 glass was used. Diamond-shaped distortions on the edge or non-uniform illumination reflections are the result of less expensive BK-7 glass.
Resolution and field of view are set by the lenses used and can be determined easily by looking through the optics. If you look at a print-out of the picture at the end of this chapter from a distance of 10 yards (meters), you will be able to separate some of the line series in your binoculars, while others merge into a solid bar. The bars which you can resolve correspond to the resolution of your binocular. The bars have a length of 0.5°, which equals approximately the diameter of the Sun and Moon. The circle above the bars also has a diameter of 0.5°. In it the separation distances of some double stars are shown, which give you a feeling of the units arc minutes and arc seconds when observed from a distance of 10 yards or meters.
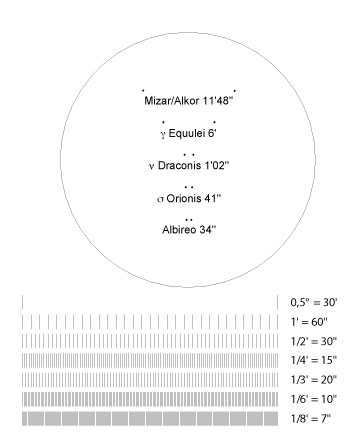
You can also measure the field of view with the stars of the Big Dipper: The upper stars are about 10° apart, the lower 7°. The stars at the end are separated by about 5°.
The mechanics should be as robust as possible, and the binoculars must not be misaligned – if you see double images, both tubes point into different directions. A slight adjustment can indeed be compensated for by the eyes for some time, so it is not too obvious, but it quickly leads to headaches. If you observe a distant object alternately with one eye and then with two eyes (you can cover one lens with your hand) and notice double images for a short time or if the image “jumps“, the unit may have taken a hit by a fall and is out of adjustment.
There are two different kinds of housings for binoculars – German and American style. In German housings the lenses and prisms are in separate components, while American style binoculars combine everything in one single piece and are therefore less susceptible to dirt and bumps. There are also binoculars that can easily be focused using a central wheel, while other models have to be focused individually on each eyepiece.
Color aberration and edge blur can be seen clearly when you look at sharp edges at some distance (antennas, building edges or roofs). Some distortion at the edge can be tolerated but it should not extend too far into the field.
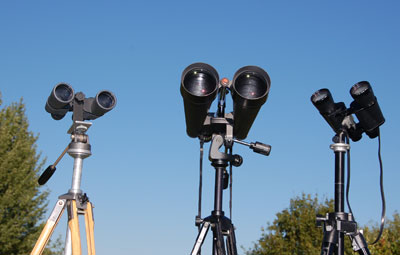
A binocular should definitely have a photo thread to attach it to a ball head or an L-adapter and a tripod. Only when it is in a fixed position, the image is steady and you can fully use its power. You can use a pair of binoculars with up to 7x magnification reasonably stable without a tripod, but most people need a tripod for magnifications more than 10x.
In principle, any photo tripod can also be used for a pair of binoculars, but it should be possible to extend it at least at head height – as most of the time you will be looking up. Wooden tripods dampen vibrations better than aluminum tripods. The matching ball heads are also available at photographic stores.
In addition to these simple solutions, there are also full-size binocular mounts available. Very comfortable are parallelogram mounts which work much like an old, height-adjustable desk lamp. In this case, the binoculars are mounted on two parallel rods. It is adjustable in height so that you can stand not only directly under the binoculars (so that the tripod is out of the way when you look at or near the zenith), but you can also change the height without losing an object. The latter is especially helpful when you want to show an object to different people.
Tinkerers can find many instructions and tips on the internet and can build, for example, a Sky-Scanner. In this case, the binoculars look down on a mirror, so that you can look comfortably down into the binocular and don‘t have to worry about a stiff neck. However, finding objects is no longer quite so simple, and you can‘t use just any cheap mirror.
Other accessories are neither readily available nor necessary. You might think about some dew shields which you can make yourself easily. These are small tubes whose length should be about twice as long as the lens diameter. They are put over the tubes and protect the lenses from fogging. When it cools at night, the humidity without dew shields can not only condense on the housing, but also on the lenses, so that you may look through a film of water after some time. Lens shades can be easily prepared from tubes, cardboard or flexible plastic. To avoid reflections, they should be painted matte black on the inside.
For safe solar viewing, you can easily build a suitable filter which is mounted on the front lenses. Baader Planetarium, Mammendorf, Germany, provides foil material including instructions for this – Check out protecsolar.com for their AstroSolar Safety Film. Do not use other, self-made filters (space blankets, shooters glasses, CDs) or even filters mounted in the eyepieces, they provide no protection!
Very good binoculars – which may cost more than a comparable telescope – offer comfortable angled viewing and interchangeable eyepieces for different magnifications. Here, you can also use deep-sky filters for the observation of nebulae.
In recent years, binoculars with image stabilization came on the market, which can also be used for astronomy. However, the resolution is usually a bit worse than with permanently mounted equipment – a tripod adapter is helpful in making binoculars useful. Especially Russian models incorporate solutions that do not require electronics – but sometimes you have to press and hold the button that turns on the stabilization very firmly which makes longer observations hard. Other models are stabilized electronically – as long as the batteries last.